Keith Parker
Coupe to Convertible Instructions

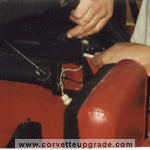
STEP 1: -REMOVE SEATBELT BOLTS “SHOWN”
-REMOVE SCREWS FOR INNER ROLLBAR
-REMOVE INNER PLASTIC ROLLBAR

STEP 2: CUT WIRE BUNDLE “SHOWN”
– DISCONNECT GOUND WIRES FROM ROLLBAR

STEP 3: REMOVE ALL NUTS HOLDING HATCH AND 3RD BRAKE LIGHT IN PLACE

STEP 4: DISCONNECT AND REMOVE ALL STRUTS

STEP 5: WITH ANOTHER PERSONS HELP CAREFULLY LIFT REAR WINDOW FROM CAR

STEP 6: REMOVE ALL THREE PLASTIC PIECES FROM REAR CARGO AREA

STEP 7: REMOVE WEATHERSTRIP FROM CAR

STEP 8: CLEAN GLUE OFF EDGE AROUND CARGO AREA USING SOLVENT

STEP 8: UNCLIP WEATHERSTRIP FROM DOOR JAMB AND SECURE IT UP WITH TAPE. “SEE NEXT PICTURE”


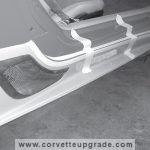
STEP 10: MARK ALL AREAS SHOWN WITH TAPE IN PICTURE

STEP 11: CUT AREA AROUND CARGO AREA WITH SAWSALL

STEP 12: CUT ROLLBAR OFF ON EACH SIDE. NOTICE HOW THE ANGLE OF THE SAW BLADE IS LEVEL WITH THE CAR. CUT RIGHT DOWN THE SEAM LINE OF WHERE THE ROLLBAR MEETS THE QUARTER PANEL. MAKE SURE YOU DO NOT LET THE BACK EDGE OF THE SAW BLADE DRIFT AS YOU MAKE THE CUT.

STEP 13: GRIND ALL AREAS WHERE YOU CUT. MAKE SURE THAT YOU GRIND AREA SHOWN IN PICTURE ALMOST FLAT WITH QUARTER PANEL.
AT THE SAME TIME GRIND AREAS OF EPOXY INSERTS WERE GLUE BONDS “SEE NEXT PICTURE FOR AREAS”


STEP 14: MIX 1 1/2 TUBES OF EPOXY ADHESIVE AND APPLY TO LOWER INSERTS AS SHOWN

STEP 15: POSITION LOWER INSERT IN HOLE , DRILL, AND SECURE WITH SMALL SCREW. USE LEFTOVER MIXED EPOXY TO FILL VOIDS AROUND INSERT. MAKE SURE TOP OF PAD IS LEVEL WITH CAR

STEP 16: POSITION PINS IN HOLES AND MARK. grind TOP HALF OF PIN. NOTICE NOTCHES GROUND IN PIN ON LEFT SO THAT EPOXY HAS BETTER ADHESION.

STEP 17: DRILL HOLES FOR SET SCREWS “ALAN SCREWS” 1/2″ BELOW LEVEL. PUT PINS IN HOLES REDRILLTO MARK PINS AND GRIND A V ONTO PIN SO SET SCREWS WILL LOCK.

STEP 18: TAP HOLES WITH INCLUDED TAP.
“NOTICE V GROUND INTO PIN”

STEP 19: PLACE 2″TAPE OVER INSERT AREA AND QUATOR PANEL.
PUSH PINS THROUGH TAPE
LOCK ALAN HEAD SET SCREWS IN PLACE WITH ALAN WRENCH
MIX 1 1/2 TUBES EPOXY AND APPLY ON UPPER INSERTS. MAKE SURE YOU PUT ALOT OF EPOXY INTO THE HOLES WHERE THE PINS GO.
CAREFULLY SET INSERTS INTO POSITION OVER PINS.

STEP 20: WITH ANOTHER PERSONS HELP PLACE ROLLBAR INTO POSITION OVER THE TOP OF GLUED INSERTS. PUSH DOWN UNTIL BOTTOM EDGE IS ALMOST FLSH WITH QUATOR PANELS. SECURE T-TOP ROOF INTO POSITION FOR ALLIGNMENT WAIT 1 HOUR FOR EPOXY TO HARDNEN BEFORE LOOSING SET SCREWS AND REMOVING ROLLBAR.

STEP 21: ROLL OVER ROLLBAR AND FILL VOID AREAS AROUND INSRTS WITH 1/2 TUBE EPOXY. LET SET AND FILE OR GRIND AREA SMOOTH.

STEP 22: NOTCH BLACK PLASTIC AREA SHOW FOR SEAT BELT CLEARENCE.

STEP 23: DRILL AND ATTACH SEAT BELT HARNESS AS SHOWN

STEP 24: CUT INNER ROLLBAR WITH USING INCLUDED TEMPLETE
STEP 25: ATTACH REAR GLASS BACK TO ROLLBAR “SEE STEP 3”
STEP 26: INSTALL INNER ROLLBAR COVER BACK IN PLACE

STEP 27: PLACE HINGE PIECES IN HOLES LIKE SHOWN
NOTICH HOW THE ARE MARKED DRIVER AND PASSANGER.
PLACE TAPE BETWEEN HINGE HALFS AS SHOWN
MIX 1 TUBE OF EPOXY AND PLACE ON HINGE AS SHOWN

STEP 28: POSITION HATCH IN PLACE AND PLACE SOME SORT OF WEIGHT ON HATCH AS SHOWN.
STEP 29: PAINT HATCH TO AMTCH VECHILE. AS AN OPTION YOU CAN PAINT THE PAD AREA WHEN YOU REMOVE THE ROLLBAR.
CONVERSION SHEET

STEP 1: LOOSEN 4 ALAN BOLTS “2 EACH SIDE” AS SHOWN

STEP 2: REMOVE T-TOP ROOF

STEP 3: WITH ANOTHER PERSONS HELP LIFT GLASS AND ROLLBAR FROM CAR

STEP 4: WITH ANOTHER PERSONS HELP LIFT HATCH INTO POSITION

STEP 5: TIGHTEN ALAN HEAD BOLTS AS SHOWN

STEP 6: PUSH HATCH DOWN UNTIL LATCH CATCHES
C4 to C5 Kit
Front Bumper
Most customers take out the honeycomb. You don’t really need it anymore, and if you take it out, you can change the bulbs in your new lights easier as well on down the road. The instructions recommend to shave off 5 inches from each side, but 99% of the customers have taken it all out.
You may have to shave off 1/4 inch off of each side of your impact bar for the bumper to clear for fitment. Also that impact bar moves up, down, left, right, backwards and forwards. That is very helpful for aligning the bumper just right. There is a metal lip that needs to connect to the top inside of the front bumper. That metal lip is by the hood. A trick is to install that metal lip while the bumper is off the car. Turn the bumper upside down and install the lip on the underside of the bumper. When you put the bumper on, be sure not to get it too close to the hood so the parts don’t crack.
Rear Bumper
Rear bumper is usually fairly easy. Some of the support bars will need to be taken off, but you can reinstall them at an angle once the new rear bumper is on. If you have issues with the sides of the rear bumper not lining up with the rear quarters, just make two small pie shaped notches out of the rear quarters and bolt the bumper up.
Side Skirts
First check to see how they are fitting. They need to be a tight fit so if you have to do any sanding, sand a small amount at a time. If you need more room (if the skirts seem too short) just sand on the inside of one or both ends to gain some clearance room. You will gain more than you think. If you feel you have sanded as thin as you want to go, but you still need them longer, you may grind flat the lip that is located in the back of the wheel well. It will not hurt your car. Then, the skirts should snap into place.
Side Vents
These just get placed where your old ones were. I should have mentioned this earlier…before putting the kit on, take a walk around your car and make sure your stock parts are lining up as the factory intended. Those parts being the hood and doors mostly. This kit was tooled off a mint C4 that had no misalignment issues. The vents would probably be best to install last because you are lining them up with the hood, side skirts and door panel.
Door Panels
These simply get bonded onto your door. They set right above the side skirts. Use sand paper to scruff up the lower portion of your door so the epoxy will hold the door panel on tightly without ever falling off. You get one shot at it, so make all of your preliminary marks where the panel needs to go before you epoxy it on your car. You may chose to go out and get an epoxy that sets at a slower rate just in case you need to move the door panel around a little. Then when you are done, clamp it down into place and let it set the proper amount of time for the glue to set.
Lights
You will need to fabricate your own brackets for the lights. GM does not sell any. The lights on the front bumper get installed from the back of the bumper. They set behind the openings, not in them. The holes for the lights do not get cut out by us. We do not keep the lights in house, so we prefer to have the customer cut them so they get the proper size cut out. When installing the rear tail lights, you may need to sand slightly on the sides of the housings for them to slip into place. They need to be in there tight, so be careful not to sand too much.
Prep Work
Please do not use any chemicals on the parts. Some people try to wash off the black gelkote rather than sanding it. That will result in wavy, warped parts. Rough them up with 80 grit sand paper while doing necessary body work. Be sure to have Dura-Glass or other types of bondo with fiberglass in it. Also fiberglass pinhole filler may not be a bad idea. It will be a good investment. Then smooth it out with 300 grit paper, or similar grit, use a high seal primer and you are good to go. We recommend to do a dry fit of the parts first, then install them before painting. Make your adjustments to the parts according to your Corvette, then take them off for paint. One other thing, in the bumpers you will see where there are indentations where the bolts would go. You do not need to feel like you have to bolt along those guidelines. You may use the bolts anywhere it fits best for you.
C5 Style Speedster Hatch 84-96
Dry Fit:
Since no two Corvettes are identical, we recommend that you dry fit the part onto your car – mark where you may need to sand extra…etc. This way you won’t run into any problems after you have already painted the part. You will be doing your sanding prep work next, so that is the best time to make any alterations if necessary.
Prep Work:
To sand the part, we recommend you to block sand or DA the parts out with 80 to 150 grit sandpaper. Whenever we prep parts, we spray a light mist of white spray paint over the part as a guide coat to show us where we have sanded. Also during this process, you will want to do any pin hole filling and/or work if needed. Along the seam lines you may see some pin holes. This is normal in any fiberglass that has two parts bonded together. Luckily, the speedster hatch doesn’t have many bonded parts except on the roll bar attachment. We recommend dura-glass for body work and fiberglass pin hole filler, for those repairs.
Spray the part with primer. We have found a high seal primer works best…K-200 or something similar.
Refit the part, then wet sand with 400 grit paper. You are now ready for paint.
Hatch Installation:
Remove the inner liner from your roll bar.
Undo the four nuts holding the rear hatch in place
Make sure you disconnect the rear defrost and the struts
Very carefully, lift the rear glass from the car and safely store
Remove the three pieces of plastic surrounding the rear cargo area
Remove the rubber seal around the cargo area (weather stripping) ** see note below **
Place hatch onto cargo area
Push down to lock into place
Slip roll bar into place and tighten down with the included nuts
Reinstall inner roll bar liner
Window can be slipped in at time of installation of roll bar.
To remove window, you must remove inner roll bar.
** The reason you have to take out the weather stripping from the cargo area, is basically because the GM stripping is too thick. We have had several customers who have went to a place like Autozone to get a smaller stripping. The bottom of the hatch has a lip which can be grinded as well…so if you take both of those steps, you should be able to make that part of the hatch weather proof. One customer was actually able to get the hatch to fit with the GM stripping. **
GC5 Kit Information & Instructions
SIDE SKIRTS:
Remove rear wheels and wheel wells.
(this step is optional and not necessary
Remove (3) torx screws (#15) behind the doorjambs
that hold rear quarters to doorjamb. Install
one nylon washer between rear quarter and doorjamb on
bottom screw. This will help with the alignment of rocker.
Remove (unbolt) factory plastic.
Hold rocker in position and use 2” tape to hold
in place.
(Note: rub the tape across your shirt or pants to take out
some of the stickiness. This is to keep the tape
from sticking too strong on the paint, to keep it
from doing possible damage to the clear coat.)
Mark the bottom screw holes on the rocker and remove rocker.
Drill the bottom screw holes with drill bit
and install clips or bolts on underside of vehicle.
Reinstall rocker and tighten fasteners. Adjust
until satisfied with fitment.
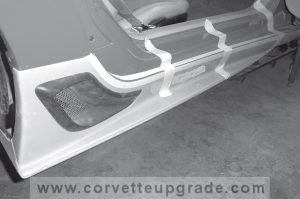
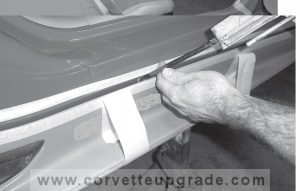
Put tape on rocker and doorjamb, up to
the edge of the seam where the epoxy will
bond the rocker and doorjamb together.
Loosen or remove rocker fasteners, until
there is a gap for the epoxy nozzle to go
into.
Put epoxy into seam.
Re-tighten fasteners and wipe the seam down low
with paper towels or Q-Tips with an automotive
wax and grease remover on it. Use tape to
tighten the fit of the rocker to doorjamb gap as
needed, leave tape on until epoxy fully cures.
(Note: if epoxy begins to harden before you
finish cleaning, you can finish by using
acetone carefully and sparingly.)
Reinstall rear wheel wells if uninstalled.
If the skirts seem like they have too tight of a fit, just sand down on the inside ends and thin out the fiberglass if needed. Every now and then, a customer will notice the skirts are a very tight fit. Don’t be afraid to sand on these parts to thin them out. They can be very thin without risk of damaging the part. Also, remember that once the part is on the car, the fiberglass will conform to what it is being bolted on. You will gain a lot of clearance just by sanding and properly bolting the skirts on.
REAR WRAP:
This is the easiest piece to install. You can either counter sink the hardware, then Dura-glass over them so you cannot see the hardware, or you can epoxy the piece onto the car. If you use fiberglass welding epoxy, the part will stick on there so good – it will never fall off if done correctly.
You only have to hold the part up to the car, make your alignment marks, and that is it. Attach to car however desired.
REAR WING:
The other simple install. We have already drilled and tapped the wing for you. There are 1/4 inch steel plates in the wing pedestals, so you don’t have to worry about brackets, or the wing falling off. It will not fall off! Hold the wing onto the car where you feel it sets best. Make your marks. We recommend taking out your license plate and two inner tail lights to give you room to reach up and bolt the wing into place. You DO NOT want to uninstall the rear bumper. Many shops will tell you have to do this, but you don’t. Once you uninstall the urethane bumpers on these cars, it will never look the same as it does now. None of our customers have ever had to take off the rear bumper for this install.
FRONT SPOILER:
We recommend taking off your plastic air dam in order to have the most room to maneuver the new front spoiler.
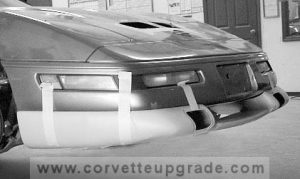
Trial fit Spoiler
a. Use 2″ masking tape to hold spoiler sections in
place.
b. Find the best location for the 3 pieces.
Mark & drill holes.
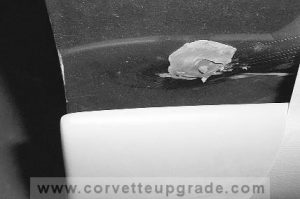
a. Make a small pancake of clay and place on stock (you can also just use a sharpie pen)
bumper in the area of all 3 clip or bolt locations on one side
of the front spoiler.
b. Adjust the clay until you get a good impression of all
3 holes at once.
NOTE: making the clay pancakes as thin as possible
will yield the most accurate hole locations.
c. Drill holes through the marks in the clay,
making sure that the drill bit doesn’t “walk” across the bumper.
______________
a. The two side positions on the spoiler are attached
with screws from the inside of the bumper.
b. The front position on the spoiler is attached with a
screw, from the inside of the spoiler. This is why
it is unnecessary to install a clip in the stock bumper.
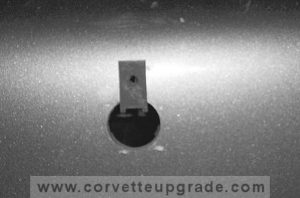
Hold a clip up to the front hole in the stock
bumper with the clip facing forward.
d. Mark the back of the hole where the clip will be
installed.
e. Measure back 1/2″ and use appx 1/4 inch drill bit to make
a hole in which the clip will be placed.
NOTE: You want the clip to be installed from the back
of the screw hole. DO NOT make the hole
toward the front of the car. Make it towards the back of
the car.
PLEASE NOTE: Only make a hole large enough for your clip to fit into – the way it was done in this picture, the hole
is too large for what we like to see.
Trial fit Spoiler pieces.
a. Mount one side of the Front Spoiler, and snug the screws.
b. Fit the other side Front Spoiler with tape, with the center section in place.
c. Find the best fit of the pieces in unison, then tighten the screws on the one side.
d. Repeat the procedure for the other side of the Front Spoiler.
The center bar can be installed by putting bolts or screws on to the sides of the pods. You won’t be able to see any of this hardware once installed.
If you look at the pods, you will see sections that flange out which look like tabs…that is where the hardware gets installed, and you will not be able to see any hardware at all once the kit is installed. There are at least 3 tabs in each pod. (there are also flanges on the lower rear bumper wrap) You do not install the pods by drilling from the outside. One thing as well, the urethane will conform to all of these parts, so fitment will look very nice.
Prep Work
Please do not use any chemicals on the parts. Some people try to wash off the black gelkote rather than sanding it. That will result in wavy, warped parts. Rough them up with 80 grit sand paper while doing necessary body work. Be sure to have Dura-Glass or other types of bondo with fiberglass in it. Also fiberglass pinhole filler may not be a bad idea. It will be a good investment. Then smooth it out with 300 grit paper, or similar grit, use a high seal primer and you are good to go. We recommend to do a dry fit of the parts first, then install them before painting. Make your adjustments to the parts according to your Corvette, then take them off for paint. One other thing, in the bumpers you will see where there are indentations where the bolts would go. You do not need to feel like you have to bolt along those guidelines. You may use the bolts anywhere it fits best for you.
Corvette Upgrade meets Corvettes @ Carlisle
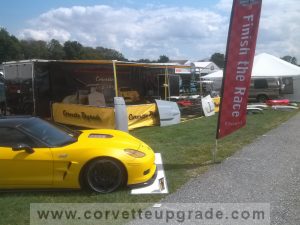 Zora was looking down on us as the weather was perfect all weekend. Being a 25 year attendee of this show, I can assure you that hasn’t always been the case. We had a great spot on J Row across from the Manufacturers Midway and watched the tram and taxis shuttle people back and forth all weekend. It was great meeting customers person to person (the long distance award goes to one individual from Florida AND Canada, long story). There is always room for improvement and we take the lessons learned and hope to apply them to future shows. Keep checking back to see where we’ll be next!
Corvette Upgrade Goes Mobile
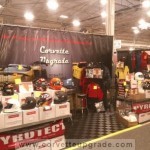
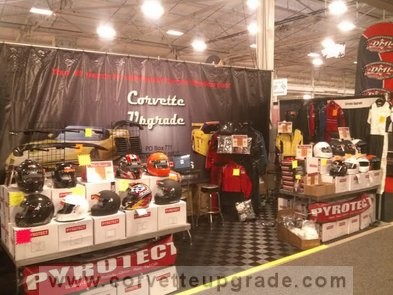 Corvette Upgrade took the show on the road to meet our customers at the Pioneer Pole Barn Motorsports Expo, Oaks, PA Jan 23-25 highlighting our extensive racing safety gear. As first efforts go, it was a great show!
Check here for upcoming shows.
Corvettes at Carlisle Aug 27-30 (Spaces 205-209 across from the Manufacturers Midway).
